Friday, December 13, 2013

Completed: Fair isle sweater

Finally picked up my laptop n get to blogging.... And now introducing my lovely n cosy fair isle sweater.

 
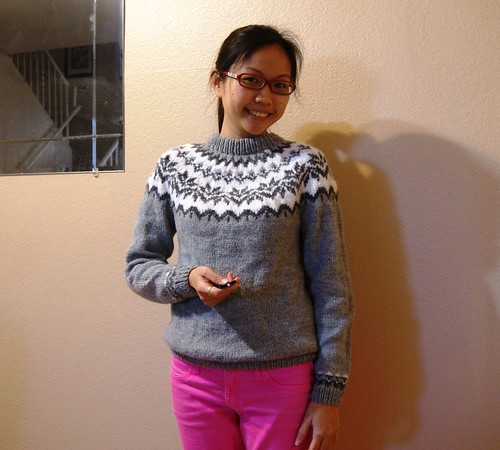
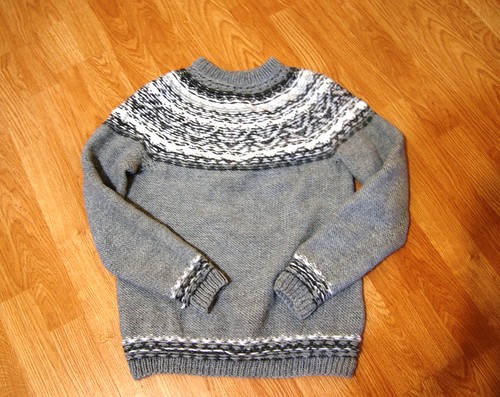
Simple and nice design and moreover the knitting pattern is free! Who doesn't love free stuff?
 
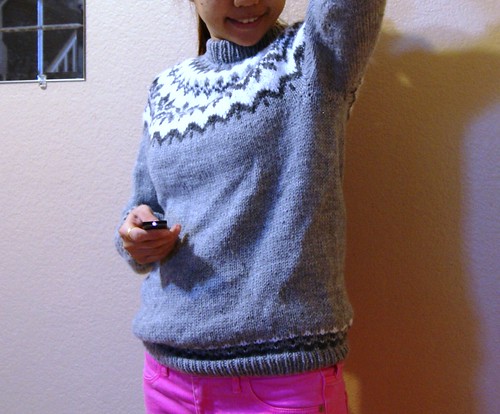
Knitting pattern used: Afmæli - 20-year anniversary sweater by Védís Jónsdóttir
Yarns used: Lion brand wool ease grey heather 5 skeins, frosty white 1 skein and dark grey 1 skein. I got all of them on sale at 2.99usd each at joann so in total, this sweater costs me 21usd. Whee!
Needles used: 4mm and 5mm needles.
I am falling in love with lion brand wool ease yarns, it doesn't empties my pocket, is warm n cozy and fast to knit up. Maybe cos I haven got the courage to spur on those expensive merino yarns yet so I don't really know the quality diff of the yarns. And further more, a year and 3 months later, we will be moving back to the hot n humid tropical Singapore, so all the coldwear knits will be stored away then. Sad. Yes very sad. I really enjoy the cold weather here and love knitting the cold wears.


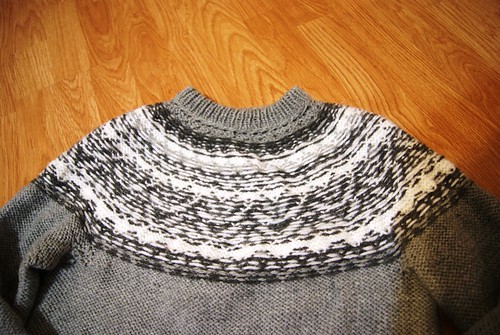
Ok back to the pattern, I was shocked initially when I downloaded the pdf only to find less than 1 page of instructions and 1 page of chart. I was like: huh? it's a sweater? n the instructions are so little? shouldn't it be long n winy?  

But after starting this project, I realized just how easy it is to knit. The fair isle portions are the most exciting and satisfying part. For the sleeves I used magic loop method as I came to dislike dpn now. Magic loop method is so much faster. My stranding skills have improved a lot and is neat n tidy now.

 
C? A huge diff from my previous projects. LOL!
 
 
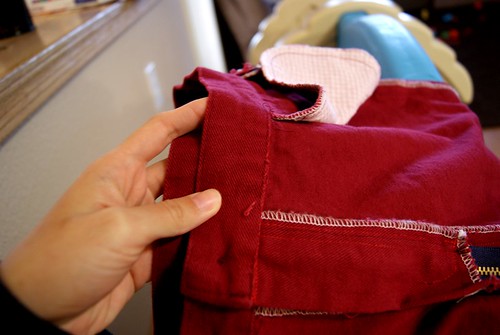
I learnt a new seaming technique called the Kitchener stitch for the armholes. Sounds confusing but after watching the tutorial on youtube, its really easy as long as you follow the 'rhythm' . And the end result is seamless finishing look at the armholes. Awesome! Whoever invented that is a genius.
 
 
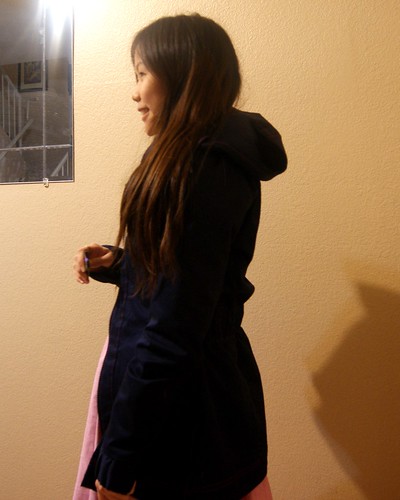
I love my new sweater, I had it on when I went for the black Friday moonlight outlet shopping at 3am and it kept me warm n cosy throughout the shopping trip. Brought lots of stuff that night for myself n the boys. How about you?
 
Thanks for stopping by:
XOXO
Ashley 

Wednesday, November 20, 2013

Completed: Skinny Jeans for Aidan

Remember my maroon bull denim jeans? I had almost 1 yard of remnant left after that and I turned it into a mini skinny jeans for my big boy Aidan.

 
Pattern used: Skinny Jeans from Peekaboo Patterns
Materials: Bull denim in maroon, remnant quilting cotton for the pocket lining, 1 button for closure.
Time taken: As usual, I find that sewing mini clothes for the kids are tougher than adults cos everything is so mini especially the hemming portion.
I brought the pdf version n printed them but, somehow my printer missed out on the pattern edges, (must be the wrong settings), so I have to roughly gauge and add the missing width myself. I choose the easiest method (elastic waistband) and faux fly for finishing. The fit is a bit too tight for my boy though, especially the waist portion. I really have to pull hard to pull it over my boy bum. HAHAH. But overall, the jeans looks really cool.
In future, I will reprint the patterns again and try out the many other finishing options.
 
 
The patch pockets and the belt loops. The pattern actually asks for stretch denim, which I did not. The bull denim doesn't really stretch, so it might not be as comfy for my boy.
 
 
I also sew up some long tees for the boys using the remnants gray interlock fabric. They are actually meant for the kids clothes week posts, but we went on our SF roadtrip then so I missed the 'series' and they became 'backlogs' till now.
 
 
Didi in his plain long sleeve tee.
 
Pattern used: Charlie Tee from Fish sticks design
 
 
Ok, got to go... Good bye! Closes Door...
 
Thanks for stopping by.
XOXO Ashley

Tuesday, November 19, 2013

Completed: Moose Isle Hat


I was looking through raverly hat patterns and this cute moose hat grabbed my attention. I had to knit one of that straight away. So I popped by Joann store and brought lion brand wool ease yarns in the colors needed.

Its's my first time trying fair isle knitting. And I fall in love with it straight away... That explains my latest finished fair isle sweater for myself n a ongoing dino fair isle sweater for my boy.

PS: I am having problems with uploading pics into my flickr and on my blog... So pardon the shitty FB pics.

Materials used:
1 skein of LION brand wool ease in choco
1 skein of Lion Brand wool ease in Fisherman
Some remnants of Everyday yarn in red (that I used for my honey comb cowl)

I used 3.5mm n 4.5mm circular knitting needles and used magic loop method for working in the round.

For the pom pom I used the Clover pom pom maker which I brought years back in sg.

While working with the colors for the moose portion, I viewed some youtube technique videos for stranded colorwork. I tried to learn the technique of knitting with one color in each hand, but my left hand is still quite clumsy especially the tension part.

 
Pardon me for the super messy and ugly wrong side. I only noticed the correct yarn changing method while knitting my fair isle sweater thus this hat is really a first time anyhow try at strande colorwork. And because of the anyhowness, the different color yarns keep twisting n tangling. And the tension is very different thus some floats are a bit too tight. I also made a terrigible mistake of weaving the float at the same stitch for many rows causing bandings to occur. So many mistakes in it, but that how u learn right?
 
Anyway the right side of the hat still looks ok. And I love my new hat. I even used the remnant choco yarn to knit a simple pair of fingerless mittens so I can match with the hat:)
 
 
I haven blocked the mitts yet and the other side is still missing somewhere in the wardrobe. LOL.


The red trimmings really pops. Ohya, I am wearing the fair isle sweater for the pics. Will blog about it in the next post:)
 
Thanks for stopping by:
XOXO Ashley


Sunday, November 17, 2013

Dipping into coupons and savings world...

Last week, I watched my first episode of extreme couponing on TLC channel by chance. And I got so drawn into the couponing world and started to try out on couponing for groceries as well.

I had been using ebates to earn cash backs on my online fabric purchases and Joann coupons for in store purchases. And now I am trying out Ibotta for groceries cash backs and coupons as well.

Just 2 wks upon downloading Ibotta smart phone app and I had already earned more than 10 bucks. I highly recommend it if u r staying in US.

You just need to download the app to your mobile device and choose the offers you want to take advantage of. After you purchase the item, choose the store you went to, take a picture of your receipt, pick the item from the list and scan the barcode.

Then all you do is watch your Ibotta savings add up. You can withdraw your Ibotta savings as soon as you hit $5 or more and it will be deposited directly to your paypal account!!

Try out with Ibotta today!!

PS: Other than knitting non stop, my other past time now is cutting coupons... HAHAHA.

Friday, November 15, 2013

Completed: Dinosaurs Set for the boys


Ok, they are actually meant for Halloween, and I am so sorry that I took so long to blog about them:P

Aidan (my bigger boy) is currently living in the Jurassic world. He keeps asking to play his dinosaurs dvd collections and of course, his dinosaurs toys are also growing in numbers. So I decided to sew up dinosaurs hoodies and pants for the Halloween party which are also suitable for everyday wear as well.

 
See how happy he is? LOL.
 
 
For the hoodie: I used the Charlie Tee and Hoodie Pattern from Fish stick designs.
In order to Insert in the dinosaurs spikes, I did a little pattern hack by splitting the hoodie pattern into 2 and adding seam allowances to it.
Materials used: Green interlock knit from Joann.com
I started to fall in love with their interlock knits. Although their retail prices are quite exp like $9.90 per yard, but when u got a 50% or 60% coupon, you can make full use of it and had them at a cheap price. So every trip, I usually buy more than 3 yards of it, to make the coupon worth while and have lots of spare to make into other tees for them or myself.
 
The spikes are made from darker green felt from joann as well, I am so lucky to find a half yard on the remnant section:)
 
The sewing of the hoodie is really straight forward and simple. And it just take 1 day to finish up on the 2 hoodies for the boys.
 
 
For the pants: I went back to my beloved Treasure Pocket Pants Pattern.
I really like this design as it doesn't look too simple and allows for a contrast pop of fabric usage.
For the materials: I used green kona cotton and the dinosaur prints cotton from fabric.com
While cutting the pieces, Aidan was actually beside me admiring the dinosaur prints on the fabric and kept repeating: 'See nani, dinosaurs!' Yes, he calls me nani as he couldn't pronounce the 'M' properly. Even his school teachers are confused by him and thought I am his nanny instead. Luckily, the little one calls me 'ma ma'... Hopefully, when his pronunciation gets better, we will be able to correct him back to mummy...
 
Beware! Allen the Dino is stomping away!
 
The usual bribing with sweets in order to get the boys attention for photoshoot.
 
Oh,  a front pocket!
 
And lastly, Allen ever so cute smiling face.
 
Thanks for stopping by:
XOXO
Ashley
 
PS: Sorry for the late updates, I just finished my fair isle sweater 2 days back. HAHA.


Monday, November 11, 2013

I caught a bug!

Yup... A very serious bug... It's getting colder nowadays, n I caught the knitting bug again. I just keep knitting n knitting on the couch, had finished with 1 hat, 3 sets of fingerless and halfway through a sweater for myself... With both of my hands busy on the needles, eyes on the boys, cooking n housework while their naps, I have neglected my blog. I have gt so many finished apparels for myself n the boys waiting to be blogged n of course the knitted accessories as well. 
Every time I tried to shift my attention to blogging, my mind just keep switching back to knitting mode...   Maybe I am just too excited with my first fair isle sweater, maybe I will be more settled down after finishing that n be able go get back to blogging on the fos. Yes... Back to knitting.... Bye.


Monday, October 21, 2013

Project Sewn Week 4 Entry: My Signature Style

I am having so much fun sewing along with PROJECT SEWN:) And this is my last entry for their week 4 challenge: Signature style. Hmm... I am not really sure of what exactly is my signature style at first, so I went to look through all my previous sewing works. It seems that I love navy and red colors a lot. Further more, I am in desperate need of a fall jacket as we will be going for a road trip to San Francisco next week. And! my winning prizes from Sewaholic patterns had arrived in my mailbox. So everything mixes together and churned out an ever so cute Minoru Jacket:)


Pattern used: Sewaholic Minoru Jacket
Materials used: Cotton twill in navy color from Joann. Red Japanese flora cotton from stash. Zippers and Velcro and elastic.


This is my first time sewing up a jacket for myself, and I am really glad that I choose this pattern. It's easy enough for me and also taught me many new techniques along the way. I cut a size 2 throughout and did my usual reduction of the bodice length by 2cm. It turns out to be quite long for me still, but that wont be too big of a issue.


The jacket took me 2 nights to whip out and 1/3 of the time I am stuck at the stitch in the ditch part. (yay again! I hated it man...) I tried my best to align the seams as much as possible, but somehow, the stitching will not hit the correct spot on the under layer so I just keep unpicking the stitches and repin and re stitch. The tedious struggle ended up with a more decent stitching in the ditch but still not perfect.

 
Everything I adores are in this jacket, navy color and my precious Japanese red cotton print. Red top stitching. Super cute hoodie that can be folded and zipped up in the collar. Sweet little pockets with Velcro closure and an elastic waist at the back for overall enhancement of the figure. I even brought some coco cotton twill hoping to sew up my second minoru jacket:)


After living here in AZ for 6 months, I really love how easily available quality fabrics are and their humongous range and cheaper prices than in SG. BUT! the notions here are so expensive! 1x 500yards thread can cost more than $4 while in sg, u can get it at less than $2 each. And the zippers.... I dunno what to say. My jaws almost unhooked itself when I first saw their prices here. But I must admit that for their prices, their quality is much higher than the usual made in china notions found in SG.

 
This jacket is not super thick and cosy, hopefully it will be sufficient to keep me warm during the road trip. (Sorry I am not really sure of what to expect yet as it's my first fall experience and I can't wait for it!)
 
 
Little bitsy Velcro closure. Navy with red, I am loving it. How about you? And to all my dear readers, thank you all for visiting and even leaving lovely comments on my works. They are super encouraging to me. My English isn't really good, so I am not exactly good with words. Hope that my sucky English wont turn you all off :P
 
Thanks for stopping by:
XOXO Ashley


Tuesday, October 15, 2013

Completed: Deer And Doe Aubepine Dress

Tadaa! My second Deer and Doe project. I loved my graphic Belladone, but now I love my aubepine even more!
 
 
Sewing Pattern: Deer and Doe Aubepine Dress
 
I cut a size 4 throughout for this dress as I prefer a loose comfy fit. This dress is really easy to put together (except the stitch in the ditch part-will talk about it later in the post) and is fully lined with hot pink voile. I find that this dress is really perfect for the cooler weather nowadays maybe its' becos of the double layers. The pleats at the waistline and the trapeze skirting helped to cut down on the 'maternity' look, creating this lovely babydoll style.


Look this dress has pockets! I kept the original length of the dress and now I am still hesitating whether to shorten the length or not. What do u all think?

Materials used: Pink chambray linen sort of fabric from Singapore Chinatown PP
Lining fabric is a hot pink voile from fabric.com
Pink grosgrain ribbon from stash
And a thin elastic for the sleeves cuffs.


Ohya, this dress doesn't require any zipper or buttons closure! Great for beginners!


Actual pic taken before I cropped out my busy "boys"


The pink linen is slightly wrinkly, but I like it:) It has this country style feel to it. LOL! And the only shoes I had to go along with it is a brown winter boots brought in Taiwan years back. And finally, I will be able to wear it in this fall! Cos it's almost impossible to wear them back in SG as it is hot all year round.


My ribbon has hot pink polka dots on them, perfect match for this dress.


The inside out of the dress.

And let's get to the stitch in the ditch portion. I hated it!!! The construction of this dress as instructed is to sew up the outer main bodice and skirt first, then sew up inner lining bodice and skirt, and join them at the neckline, then stitch in the ditch between the 2 layers at the empire waist seam to create the casing for the ribbon. I tried to pin baste the waist seams together first and had quite a tedious struggle with it to get the seams to align properly. Almost 1 whole hour is spent on trying to align the waist seam. And then, the instructions say to stitch 3/8inch away from the first seam to form the casing. I did as followed only to find out that my elastic threader is way too fat to go through the small casing. Being the stubborn me as usual, I spent another 30 mins trying to squeeze my threader through the casing. Finally I gave up trying and unpicked the casing and restitch at a half inch width instead. Is it my threader is too fat or what? LOL. At least I have learnt my lesson, not to always follow what the instructions call for.

Other than the empire waist casing part, the dress is a breeze to sew. I already started cutting out my next aubepine in a maroon linen. But for the construction wise, I will definitely change the steps a bit to avoid the stitch in the ditch portion:)

Thanks for stopping by:
XOXO ASHLEY


Monday, October 14, 2013

Project Sewn Week 3: Graphic Belladone


For project sewn week 3 challenge, it is about graphics which is great as my boring wardrobe is in desperate need of more colorful prints apparels.

After seeing the many beauties sewn with Deer and Doe patterns, I had a mini shopping spree done few weeks back, and luckily the patterns arrived just in time.

Pls pardon my nerdy face, been sewing really a lot recently= which means lack of sleep=super chui complexion=lazy to put on make up.
 
 
I cut a size 4 for bust, tapering to a size 8 for waist and size 8 skirt. I just draw a line connecting the size 4 bust down to the size 8 waistline. Well, I did a super speedy muslim for this dress and the fit is just nice, a whee bit loose at the waistline, but I kind of like it this way as it feels more comfortable and allows for big meals.
 
 
Material used: A cotton calico print fabric from joann. It was under the red tag section, $5 usd per yard and I purchased 3 yards straight away. BUT! when I got home and went through Joann.com, the same fabric and design is selling at $3.60usd per yard. I felt kind of cheated. How can the prices differ so much when they are supposed to be under the same company?
 
This cotton feels stiffer than the usual quilting cotton, and doesn't wrinkles easily even after washer and dryer. At first, I had second thoughts on this fabric: Is it suitable for apparels? or is it just meant for quilting? I even tried to google cotton calico to find out what is it usually meant for. But in the end I am really glad that I choose this fabric for this dress.
 
 
The sweet back cut out design. Cute and not too exposed. Perfect for casual outings and trips. I am just too lazy and tired to try and match the prints for the waistband part.
 
 
I used invisible zipper for closure. This is my first deer and doe project and I find that their sewing patterns are great! The patterns are prints on huge white paper instead of the usual tissue paper and their instructions are clear and simplified. But I find it a bit weird, usually other pattern companies will instruct to stay stitch the necklines first in order to prevent stretching out. But for deer and doe patterns, they dun. Is it because of the designs needs? Or is it just that deer and doe never indicate as clearly?
 
 
Other than the mismatching waistband print. The bodice and the skirt actually matches.
 
 
The inside out pic. I used navy bias tape as instructed. I had a bit of struggle with the armhole curve portion. Iniatially, I just cant seem to get the tape to lye flat nicely. Until I realized that I should make notches at the curve portion even though I am using bias tape finishing. Then everything starts to go more smoothly, and the tape sits neatly. All the raw edges are serged.
 
 
The hemline of this dress is finished with facings, which makes the hem line more sturdy and less chances of wrinkling. I serged the raw edges as well and hand blind stitched it.
 
What do u think of my new dress? I love the simplicity of the design and there sure will be more belladones coming up soon.


Thanks for stopping by:
XOXO Ashley


Monday, October 7, 2013

Project Sewn Week 2 Entry: Fashion Era Challenge

Thank you all for your lovelies comments on my previous LBD. Reading them really encouraged me to sew and craft out more apparels for myself n my boys.

For this week challenge, it asks for design inspirations from vintage fashion and incorporating them into the modern fashion. Of course I got to use the delightful hawthorn pattern I had! And after finishing up a pants for myself last week, I just can't resist making another pants for myself. It's a skinny jeans this time:)

My inspiration style is the vintage pin-ups fashion. Below are some of the inspiration pics:
 
 
I choose this as they are definitely more comfy and versatile than the puffy and full skirts dresses. And I dun have the figure for wiggle dresses as well. So yup, a housewife look is born:
 
 
A pink seersucker hawthorn top and maroon skinny jeans.
 
For the top: Pattern used: Hawthorn from Colette
Materials used: Pink gingham seersucker fabric, flower buttons and interfacings.
This is my 3rd hawthorn, everything sews up in 1 night and again I skimped on the interfacings by omitting the front facings interfacings. Otherwise, not much changes from my chambray hawthorn dress. I practically used back the same tracings I used and just need to trace out the short sleeves version pcs.
 
 
I love seersuckers! This top is actually just out from the washer and dryer! No creases or ironing needed at all:)
 
 
The simple and sweet collar design.
 
The hemline is a bit uneven cos I never button it properly. It is actually even.
 
 
Added another buttonhole near the waistline there. Looks a bit cramped but I meant to wear it with a belt, so everything will be hidden.
 
 
Crisp and nicely pressed neckline.
 
 
I love the little bias cuff details for the short sleeves version.
 
 
For the jeans: Pattern used: Skinny jeans pattern from japanese FEMALE sewing magazine
Material used: Bull denim in maroon from joann.com, jeans zipper and a bit of seersucker for the pocket lining, jeans needle
 
It's my first jeans! Hoho... The sewing patterns from the jap magazines suits us Asian body shape much better as we r less curvy. I cut a straight size s this time and just added a 5/8 inch side seam allowance just in case the jeans turn out to be too tight. Lazy mummy lazy to make Muslim. And luckily lazy mummy got so lucky! The fit was right on, even the length!
 
Ready for some rock n roll? Going crazy and running out of pose look.
 
 
I couldn't get matching color zipper so I just opted for navy jeans zipper instead.
 
The back patch pockets.
 
 
Inside out pic. I only had black and white serger threads. So pardon the whiteness!
 
 
The waistbands  of my previous pants are a bit messy so this time round, I hand slip stitched the fold in before edge stitching the waistband from the outside.
 
 
Whee! I love my 2 new apparels. How about you? Thanks for stopping by.
 
XOXO Ashley