Wednesday, July 31, 2013

Matching Outfits for 3

 
Sorry for late update. Last week I turned on the lazy mode and switched on my laptop for some drama series. End up, I got myself glued to 3 series, Desperate housewives (Yes I just started season 1 of it and still have more to come), The White Queen (their costumes are gorgeous) and Devious Maids (Super comedy).  So I barely touched my sewing machine for the whole week and turned to cross stitch instead so I can watch the TV and do the stitching at the same time.
 
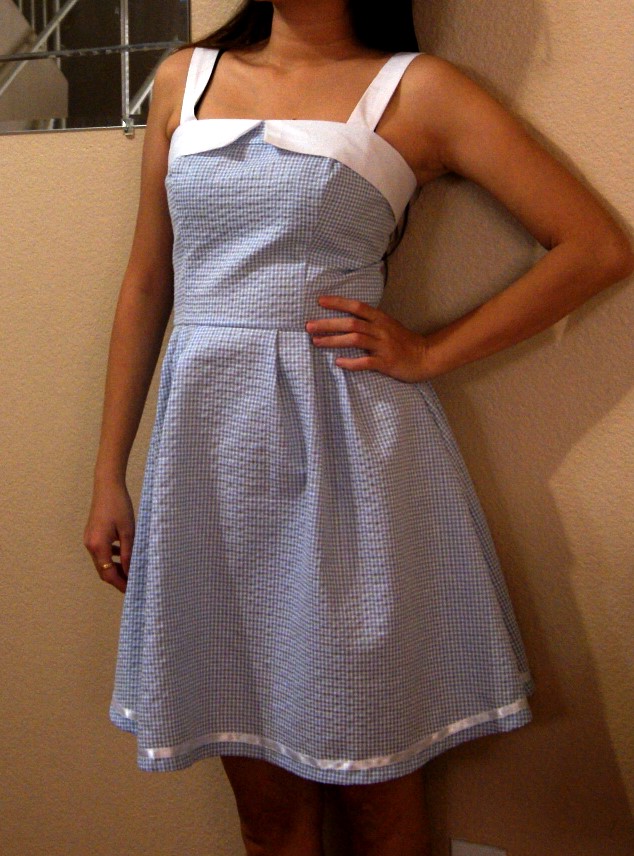
This 3 pcs are the last few completed projects I had. A matching outfit made using 3 yards of seersucker fabrics I got from fabric.com. Their fabric is so much more higher quality than from the seersucker fabric from the 'J' online store I brought before.
They doesn't crumple much after the prewash and they are a breeze to sew where else the lousy seersucker fabrics turned out to be super crumpled after I prewashed them and I got such a hard time trying to iron them nicely till I gave up and just put them aside first. In the future when I got the mood and time, I shall then continue with the pressing.
 
 
PS: I cropped my face away cos I dun wanna spoilt your appetite.
 
Pattern used: Simplicity Project runway 2176
Size: My usual for simplicity runway patterns: Size 6 bodice tapered to Size 8 waist and skirt.
Material used: Gingham seersucker from fabric.com, White broadcloth and white ribbons.
Changes made to the pattern: I just shorten the skirt by 4 inches. And the straps I removed 2inches just to get them to fit better. I forgotten that I had really straight shoulders, not much slope as what the pattern caters to, so the straps didn't really sit nicely. In future, I will have to unpick the seams and restitch the straps portion.
The skirt portion looks plain so I added satin ribbon trim to the hemline. I need your help here... It still looks a bit weird to me, will it be better if I add another row of ribbons? Or any other suggestions? I was thinking of embroidery initially since it is a gingham fabric but I realized that the skirt hemline is not a straight line so row embroidery will be a bit tricky for me.
 
And I cut out 2 sailboat tops for my 2 boys. For theirs, I added a tiny weeni cross-stitch monogram to the chest portion. I still have remnants of this lovely seersucker, should be enough for a tiny vest for one of the boys.

Aidan stealing mummy limelight again but its ok, cos mummy is not in her best condition from the lazing around.


Wow, AX! Sorry this is not to copy The super brand Armani Exchange logo, its because all our family members English names all starts with the letter A and my husband surnames starts with an X. Yay, our family initials are branded.

A mini photoshoot in our patio. Aidan running around at the speed of light.
 
Big brother settling himself comfortably in the King Chair.

Small brother saw it and started to push his brother away from the chair.
 
Yay, King Chair is finally mine after a hard struggle with big brother.

Thanks for stopping by,
Xoxo Ashley.


Monday, July 22, 2013

Betty Draper Almost Perfect Plaid Shirtdress

After a good night rest, I finally got the energy to on my laptop and start on this blog post. I believe you all knew about my current obsession with mad men copy dresses. So here is my last copy item I had planned in mind. Yup after this, I told myself I should stop and sew more functional separates instead.
 
 
This Black gray plaid dress is worn by Betty Draper in the earlier season of Mad Men. The colors are more subtle and will attract less attention if I wore it outside?
 
 
And here is my version. I used back the trusty simplicity project runway pattern : 1880. Since this is the third time I sewing this, the fit is perfect now.
I made the mid sleeves version of the dress and skipped the v notch step for the sleeves cuffs.
Materials used: Cotton Lawn Shirting from Fabric.com 3yards with a bit of remnant left.
Black Buttons from walmart
 
 
This cotton lawn is really soft and breathable. I wore this dress out yesterday and it isn't hot at all. And because the material is very lightweight, the skirting is naturally puffy without the need of any petticoat. I just worn a shorts inside not because its sheer (Its' not at all) but just in case the wind decides to come attack.
 
The only changes I made is to underline the back yoke and front front as I wanted them to have more body cos just one single layer looks flimsy and distorted.


I just grabbed my alma tie sash for this shoot. Haven got a proper black belt yet.

 
And the reason to why it is almost perfect? Is the back pc I actually sewn the wrong side out and did not even notice it until I am 3/4 done, with all the seams serge, zip inserted and only left the sleeves to be attached. What a stupid mistake I made this time. Luckily I have long hair so I just continue to wear it out with my hair down? And it's at the back so by the time people have noticed about it I would have walked far away enough to not hear any chuckles or negative comments about it. HAHAH!

 
Dear readers, if you are in my situation, will you opt for the easier option (like me) or be patient enough to unpick all the seams and resew everything again?
 
Thanks for stopping by...
XOXO Ashley

Sunday, July 21, 2013

Learning to sketch design ideas...

2 months back when we walked pass the toys department of a departmental store. A book caught my attention...
This is a fashion design made easy little sketch book with fashion stencil sheets and printed ladies models for you to add the clothing to. For a person who really sucks in drawing, this little book is a really good aid in helping me with the sketches.
It doesn't cost much, can't remember the exact cost but is definitely less than $8usd range. There are many other versions of this sketch book series. Bigger sets including coloring materials and even more stencils and so on. 
Below are some drawings I had done so far...
Remember the melon mad men shift dress in my previous post? This is a brief sketch on  my initial idea. But in the end product, I decided to do away with the embroidery part.
And this is another sketch of betty draper dress copy. I had finished n taken the pics today but is really too exhausted to go n do a detail blog post on it yet. Think the kids clothes week challenge had emptied my strength away. I had completed more than 10 pcs of clothing item for both of my boys. And their wardrobe drawer is now filled to the brim. 

Have any of you seen this book before or is using it as well? 

Ok. I really got to go rest for the day. My eyes are closing soon. Will be back tml for the betty dress post;) stay tuned...

Thanks for reading. 
Xoxo ashley


Saturday, July 20, 2013

Completed: 2 Sail Boat Shorts And 1 Sailboat Top

Yup... Some more sailboat pants completed. But this time I made them shorter by just eliminating the length from the slit onwards. Maybe I shouldn't name them shorts? Should I call them bermudas instead? LOL!
 
 
Pattern used: O& S Sailboat pants
Materials used: Little Birds Corduroy Teal from fabric.com (They r on clearance sale:) This fabric is so soft and comfy, love it. Should have brought more to make into little coats n jackets.
Changes made: Shorten the length as stated above.
 
I made one in size 3T and one in size 18-24months. The boys love it. (Well, they didn't complain so... I just presume that they love it.) Initially I wanted to make it fancier by adding piping to them, but I only had peach satin pipings in my stash and I couldn't wait till the next trip to Walmart to get the pipings and start on the pants. So maybe next time then:)
 
 Valori Wells Nest Corduroy Little Birds Teal

Look at the alignments of the birds! At least I am having some improvements on aligning prints:)

And this is little brother version. Couldn't get him to pose for me so this is the only decent pic of him with his new birdy shorts.

 
Next up is the sailboat top. The instructions are very clear and straight forward. And I like how simple and easy it is to sew this top.

Pattern used: O & S Sailboat top
Materials used: Stretch Yarn Dyed Plaid Shirting from Fabric.com
Kona Cotton Remnant Black
 
Yes, 99% of my fabrics are purchased from fabric.com site. They had this super 4th of july sale where u can get additional 25% and free shipping. I took this chance and stocked quite a bit of boys fabrics to build up on handmade wardrobes for the boys. I even told my hubby that I will make all the boys clothes from now on, well except for their shoes.
The small blue buttons are from Walmart
 
Changes made: I just added a patch pocket on the front. The pattern is from a jap sewing book.
 
I made the top in size 18-24months for my little boy. As you all can see from the pics, my little boy head is slightly bigger than other boys of his age (our pediatrician has testify to that and convinced us that bigger head mean bigger brain and it's a good thing. What a brainy kid.)- so even if I unbuttoned all 4 buttons, the head opening is still a bit tight for him and he will out grow this lovely top soon. For the next sailboat top, I will need alter the pattern to accommodate my brainy boy big head.

And he got a new haircut! It's uneven but at least he still allows us to bring him to salons, unlike the big brother who will never ever allow people to touch his hair. He got really freaked out when he saw his hair falling to the ground. My hubby and I had a really hard time trying to cut big brother's hair ourselves.

Perfect cute pose.


This top is perfect for our coming road trip next month. We will be going to San Diego for 3 days 2 nights. We are going to visit Sea World as Aidan's favorite animal now are sharks and whales. Looking forward for my friends to arrive from SG and heading for this little holiday together:)
 
In conclusion, Oliver and S patterns are really great! I will definitely make more of this sailboat tops and pants for both of my boys and getting more of their patterns in future.
 
And here is a little entertainment video of my boy acting along his favorite show song. Blue clues from Nick Jr.


Thanks for reading!
XOXO Ashley

Thursday, July 18, 2013

A Gingham Boy Shirt and a funny face

Yesterday night, I managed to whip out a tiny weeny shirt for Aidan. Having made many women shirts before, I can say that this tiny sized version is so much more difficult for my clumsy hand. The pcs are so small and is more difficult to sew using my machine. Luckily, everything still sort of went well and I am really happy with the end product. This time I do remember to try to match the plaids:) Almost it's not perfect, But it's still better than the pants right? LOL.
 
Materials used: Stretch yarn dyed cotton shirting from Fabric.com
Black Kona remnants for the contrast cuffs
Blue buttons from stash
Black bias tape from stash
This pattern is from a Japanese sewing magazine for kids. I cut a size 90cm (height).
I cut out the pcs and just sew them up using my knowledge from the previous shirts making experiences. The rounded collar is really cute and makes it less formal looking. And I used the black bias tape to hide the collar seams this time due to an error made in the collar construction process.


And of course, Aidan with his sweets. I think all this photo taking sessions are making him more n more chubby. After this kids clothes week challenge, I definitely need to take a break from kids sewing so that my boys wont get obese from those treats. Ha!
 
And that is little bro trying to steal big bro limelight.


I cut the patch pockets on the bias to prevent the need of another plaid matching effort. It's a bit wonky and I am just too tired to go and make it perfect. All I can think of is.... Faster finish....

Big bro is wearing a matching Sailboat pants with the shirt. Hmm... Looks like PJ instead. Lesson learnt- never ever wearing matching tops and pants together, it really make them looks like PJs.
 
And this is the promised funny expression caught on camera. HAHAHA! Not really sure what he is thinking of then... (Mummy, pls stop taking photos! I wanna eat my sweets in peace pls?)
 
Ok. That's it for yesterday work. This shirt really took out a lot of time because of the little details. I still had 2 sailboat pants, 1 sailboat shirt cut out fabric pcs to complete tonight. Ganbatte!
 
Ohya, I am on bloglovin now. You can follow me there:)
Follow on Bloglovin
 
Thanks for stopping by.
XOXO Ashley

Tuesday, July 16, 2013

Kids Clothes Week Summer Sewing Challenge

This week is dedicated to my boys closet. And is my first official sewing challenge:)
 
Mostly are pants and shorts as they are really short of them. And because most of the fabrics in my stashes are woven fabrics. I had got 2 XL size tees last weekend and will be using them to make into raglan tees and muscles tees for them.
This sailboat pants pattern are from Oliver and S. I brought the digital version after seeing all the handsome little sailboat pants on blogosphere. First trial on it, I made it in size 2T for my big boy aidan. Using plain brown kona cotton and 4 white buttons from my stash. I really like how easy this pattern is and had no trouble with the instructions at all.

Aidan had been rolling and jumping around the whole day before I took this pic, that explains the wrinkles. And the thing on the head? Is a plastic Tupperware which he likes to wear and pretend it is a hat.

Something on TV caught his attention and finally, one nice clear pic.

Oophs... Tummy getting bigger!

And this version is for small brother. It's my first time working with plaid fabrics and I totally forgotten to match the plaids when I am cutting it. Thus resulting in this super mismatch of the plaids. Sigh. I used scraps of black kona cotton for the side panels and the faux patch pockets.

No buttonholes? Yup, from my first experience for big brother sailboat pants, I never unbutton it at all while dressing him. So this time I just shortcut and skip the tedious buttonholes and just sew on the buttons through both layers.

The faux patch pockets for decorative purposes. I just zigzagged along the edges of the patch.

And this is little brother Allen lying comfortably on the new carpet watching cartoons.


This shirt is my first version of the easy linen shirt from the book Sewing for boys. The cotton is from Riley Blake Scoot collection and kona cotton for the contract collar.


And of course a second version of the pattern using remnant cotton for the color blocks effect. I added a tab on the front to sort of reinforce the open slit.

Only sweets can calm him down for a steady clear shot. Otherwise all the pics will be filled with ghostly hands and legs.

And many more pcs to come... C you next time then.
 
Thanks for stopping by
XOXO Ashley

Monday, July 15, 2013

Slimming dress for my sis plus size shop

Last month, my elder sister who owns an ebay plus size fashion shop and asked me to whipped a dress up for her shop. She had been importing and selling plus size apparels at a very low and attractive prices for many years. She had customers from all around the world. She choose the fabrics and pattern design and I had this dress whipped out for her.


Materials used: Quality 100% cotton. In black, royal vertical stripes. And the color blocking design also helps with figure enhancing visual effect.
Size: Standard L size
Note: The dress size is not tailored to my sister body measurements thus it is loose for her.
Closes with a invisible back zipper.
The unique darted sleeves gives a bit of poufy effect to the shoulder line.
 
We accept custom tailoring in other sizes as well. Interested parties can email me at sewashley87@gmail.com for quotations and enquiries.
 
Do pop by her online shop and take a look at her pretties apparels for sale.
 
Thanks for reading!
XOXO Ashley