Thursday, April 23, 2015

KCW Day 3- Hoot! Sunsuit

Sewing and sewing non stop during the kids naptime and late into the night. All for kids clothes week. LOL! Yesterday I finished this cute little sunsuit romper for Baby A. I love dressing her in rompers as I do not have to look for matching pants or bloomers.

 
Materials used: Embroidered owls pink seersucker fabric
Elastics
Brown ribbon
Ladybug buttons


I haven mastered shirring yet. So I sew 3 rows of casing and inserted elastics through them. Elastic casing for the leg openings and even the straps have elastics in them too!

 
I love seersucker fabrics! they are a breeze to work with and is cooling, great for the coming summer heat. The straps button at the back. The awesome ladybug buttons are scored at a Goodwill trip yesterday. One bag of unused batting, tons of brand new buttons and 2 new coats and Clarks sewing thread for just 99cents! What a great deal!

 
Wobbly baby...

 
Added satin ribbon bows to the front for embellishments.

 
Lots of room to grow into and the elastics make sure that the fit is good.

 
The cute embroidered hooty owls.


Hot off the sewing machine, pardon my washable markers ink.
 
I still have many tops and skirts to finish up for my first etsy kids apparels collection. Stay tuned!
 
Thanks for visiting,
Xoxo
Ashley

Tuesday, April 21, 2015

KCW Day 2 Progress

 
Sewing sewing sewing... As promised, the finished zebra romper for Baby A.
 
 
Modifications: Shortened the elastics by a few inches but still a bit big for her. Nevermind, as least she can wear this longer before she outgrows it.
Add a touch of tulle strip cos I keep having the image of a zebra wearing a tutu skirt in my head while sewing this up. LOL! She is now learning to grab stuff so the tulle is just prefect for her to practice her motor skills.
And for the crotch closure, I just reinforced them with plain twill tape and insert in the snaps myself.
So much more neater than my first trial at sewing the snaps tape in.


The little flutter straps, so cute!


Babies look their best when they are taking photos in this position. The chubby cheeks.... aargh...


My failed attempts at trying to photo the romper on Baby A. She just can't lay still long enough for a nice clear pic.
 
Cya tml for the third day of KCW!
Happy sewing!
 
XOXO
Ashley

Monday, April 20, 2015

Etsy Shop updated!

Hi, I am happy to announce the latest items up on my etsy shop for grabs:

Baby Girls Diaper covers!


Designs available:
 
My little Pony in purple
Violet Dotties
Yellow Orange Dotties
Vintage Navy Rosies Dots
 
They are made in s sizes suitable for 0-6 months babies.
Waist: 16inch
Leg opening: 8inch
 
All are hand sewn with love by me and the leg openings are enclosed with satin bias binding.
Great as babies shower gifts.


Start of kids clothes week

Hi everyone! Today is the first day of kids clothes week and the day of mine started off like a war world 4. Sweat, finally I can sit my bum down and blog. Pardon for all my shitty photos, as usual my Samsung android phone die on me last month and due to budget wise, I got a new LG basic android phone which has shitty camera and I am just too lazy to dig out my DSLR for the pics.
 
Here are my first few submissions for this KCW.

 
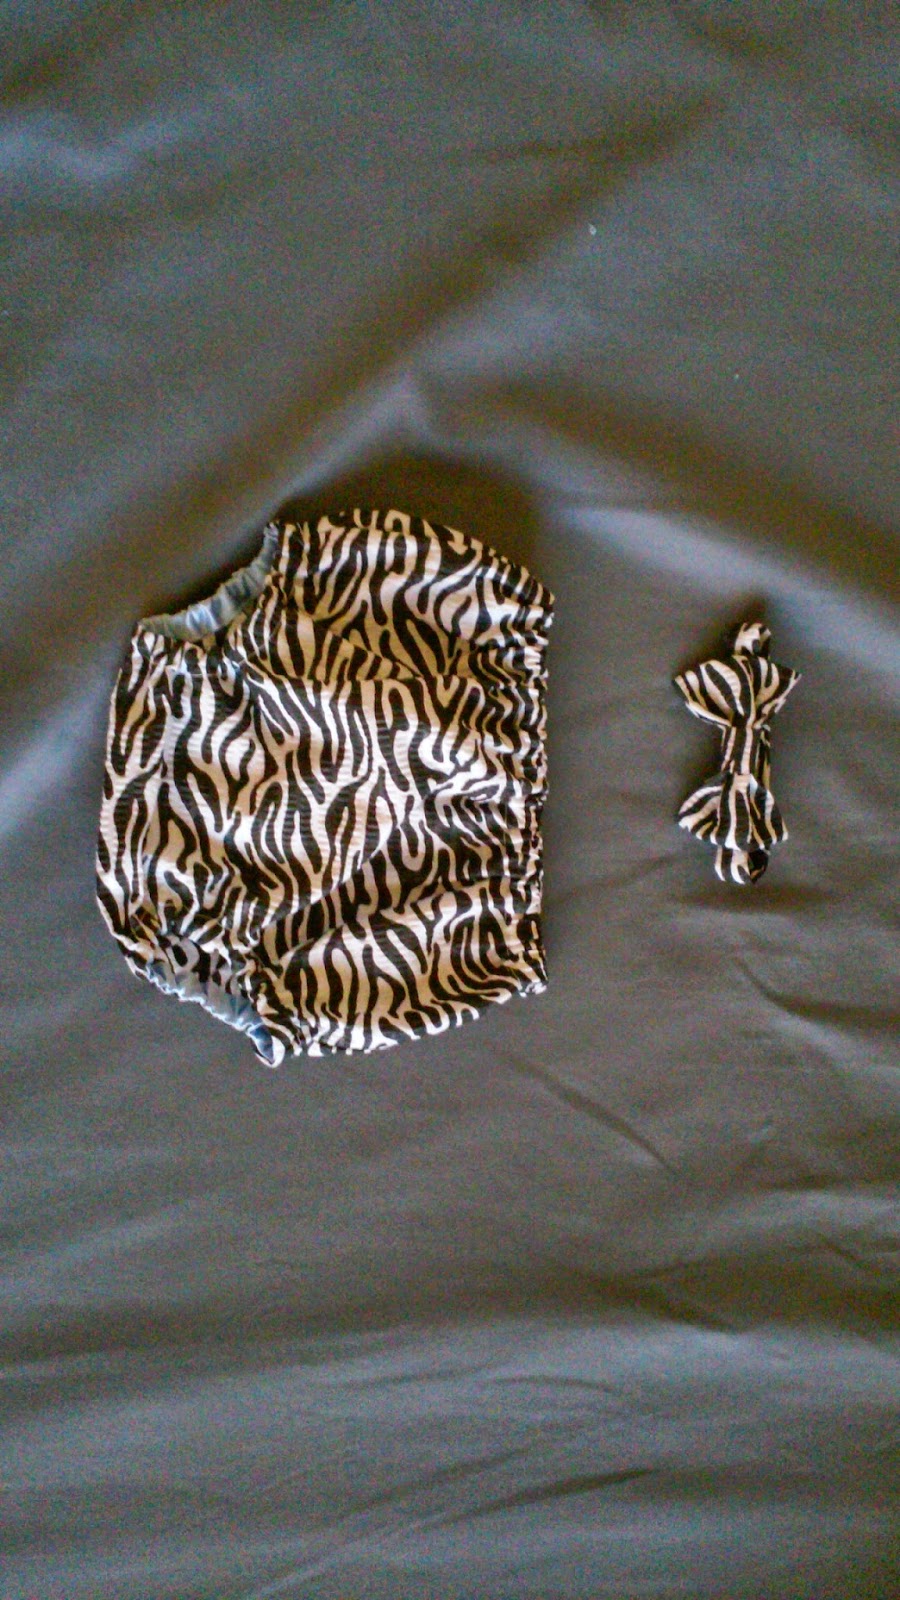
A set of zebra diaper cover and bowtie for a baby boy baby shower.
Material used: Zebra print tutti frutti cotton
Satin bias tape and elastics
 
I really like using tutti frutti apparels fabric as they are machine washable and they doesn't wrinkles! Means no ironing needed, prefect for the lazy me:)


I used satin bias tape for hemming the leg opening. Silky smooth and comfortable  for delicate baby skin.

 
My softie Olaf wearing the bowtie. Hope the baby boy will like his new zebra outfit. Prefect for mini photoshoot.

 
For the bowtie, I just made a little bow and sewn on a neck tie closure with Velcro.


Side track a bit, this is baby A with her new mummy sewn tummy time pillow. She loves lying on it and sucking on the pillow... Luckily I made it with a removable zippered slip cover so I can wash the cover frequently to remove her yucky saliva stains.

 
Her rare smile finally captured on camera. This is the pillow without the slipcover. I love her chubby face, so cute!!!

 
Next up is a ruffled zebra skort for my friend's daughter in the same zebra print fabric. LOL, I got 2 yards of this, and I managed to squeeze out yet another baby romper for baby A (which I promise to finish sewing it by the next few days). This is what I love about sewing!

 
Lace trimmings for the shorts leg hem and girly ruffles skirt overlay. So cute and you dun have to worry about your girl 'exposing' herself which is what always happen with kids this age. In future I will definitely sew this again for my baby A.


On her lovely daughter. Isn't she a natural? I just snap away and she still looks so good in all the pictures.
 
 
Sweet sweet smile.
 
How is your sewing getting along? I got tons of cut out clothes for me finish. Looking after 2 boys and a baby girl is really no joke. I got to squeeze out every energy in order to finish as much as possible.
 
And I will also be uploading baby and kids handmade lovelies into my etsy shop soon. After much encouragement from my friends and dear sister, I will be starting to sew and sell my handmakes to earn a bit of side income and also to clear my gigantic fabric stash before my family moves back to our tiny apartment back in Singapore end of this year. Yes, I have a serious fabric hoarding problem, I mean how can one not be a hoarder when fabrics here are so cheap, accessible and there are so much sales going on? Where else in Singapore the fabrics are so so much more expensive and we wont be able to own a car = public transport in order to go shopping for fabric = no way man...
 
OK, got to go, so much to do yet so little time. Cya and happy sewing!
 
XOXO
Ashley


Thursday, April 2, 2015

Playtime romper for baby A

Time flies and my little baby has grown so fast and getting more and more chubby:) And that means more new clothes for her. A perfect excuse to sew and sew. Just finished this cute little summer romper for her this morning.
 
 
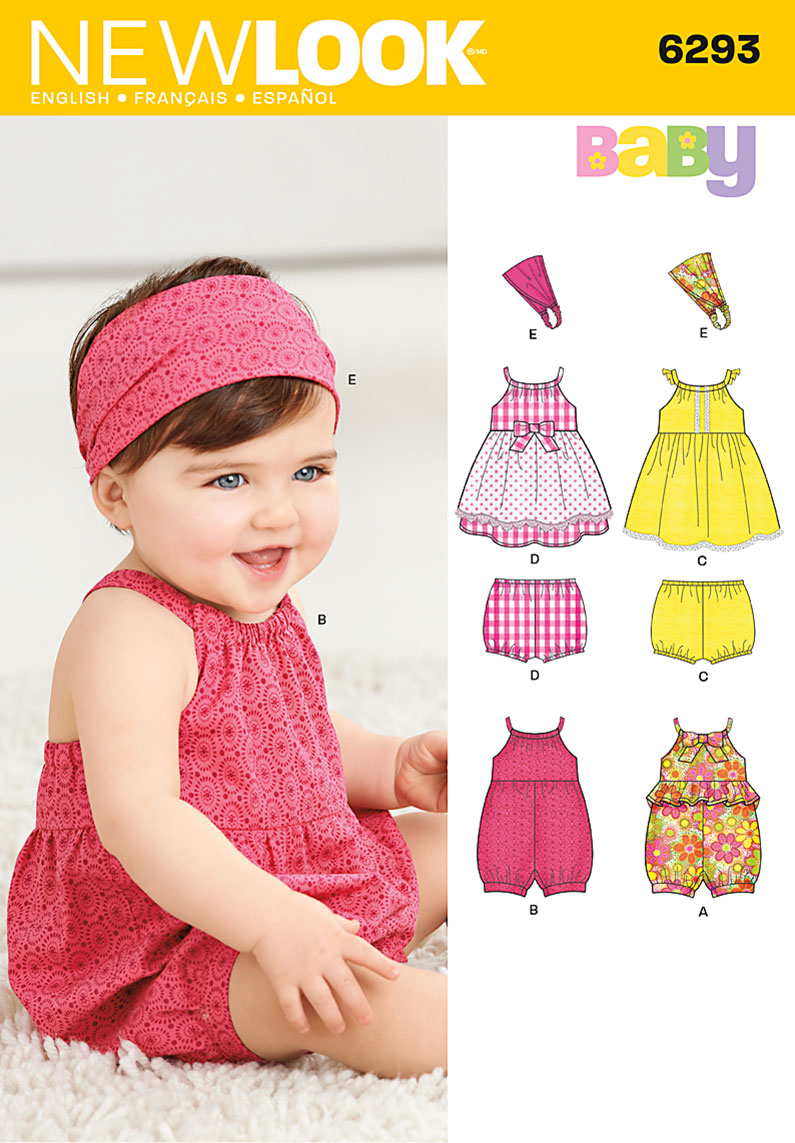
Pattern: Newlook 6293
 
 
The baby in the pic is so cute! Grabbed my attention straight away.
 
Although Baby A is 3 months now, she is still considered small in size, thus I cut out the new born size for this pattern and still ended up a bit big for her.
 
Fabric used: Tutti Frutti collection from Joann
Less than 1 yard needed.
 
Note about this pattern: Overall the instructions are very straight forward and easy to understand. Except this pattern requires you to use sew on snaps tape. Which is my first time using it and frankly, I hated it. It is supposed to line up nicely with the curved crotch seam and i struggled big time to get the twill tape to sit nicely on the curved edge. I rather use my babyville snaps instead, so much more easier and time saving. The tiny little bodice is lined with self fabric and there is elastic for the bodice front and back, lots of room for growth.


I choose design A and followed the instructions throughout. Except for the length of the back elastic, shortened it by 1 inch so my little A can fit nicely.

 
The bottom of the romper is so puffy and cute on Baby A, thinking of making another one for her in another fabric, flowers? or swiss dots? Hmm... I love the tutti frutti fabric collections, they are cheap especially if you order from fabric.com or use coupons at Joann and doesn't wrinkle. Yup, washing machine and dryer, tested and no problems at all. Great for children apparels.

 
My black snaps tape is peeking out from the crotch seam. I only had black in hand and too lazy to go Joann to buy the white ones.

 
Kicking around happily in her new romper. Ahh... I love baby girls!


Thursday, March 19, 2015

Project run and play march sew along dress. the knot dress.


Finally got my sewing mojo back, all thanks to my little baby A. While trying to catch up with the blogosphere, I came across project run and play blog their monthly sewalong caught my attention right away. This month, they are having a sew along for this free pattern by mesewcrazy. So cute isn't it? Too bad it only comes in size 2T to 6T, so I won't be able to sew for my little A yet. Luckily I know a sweet little girl of a friend who will look really great in this dress.

 
Size: 4T
Pattern: Knot Dress by mesewcrazy
Fabric: Polka Dot Tutti Frutti from Joann
 
A simple and straight forward pattern. But the end product looks awesome! Girly ties details and love love the back design:)


This pretty girl loves her new dress!

 
Good modelling yay!

 
Playing with Allen. The pics were taken after they have ended their school.

 
I can't wait for baby A hair to grow long so I can start tying her hair into nice hairdos just like big sister here.

 
Baby A in mummy made outfit. 'Mummy, you got to wait long long k, my hair still so short. LOL'
 
Thanks for dropping by!
XOXO
Ashley


Sunday, March 15, 2015

DIY no sew Tulle Dress tutorial

 
Ok, I went crazy with the pretty tutu dresses and made 2 dresses for Baby A in a day. One pink set and one purple set. SO cute!!!!
It's really easy, and each dress and headband set only took me 2 hours to complete. Below are the materials needed.
 
 
-6inch tulle spools in your preferred colors. I choose this over the tulle fabrics by yard as it is precut and saves me a lot of time. Got them from Joann store.
-Matching crocheted headbands. Got 26 different colors from amazon at $9.99usd without tax. What a good deal!
-Measuring tape.
-scissor


Firstly, you will need to measure the desired length of the tulle dress. I just measured the length from Baby's armpit to her feet. Which is around 27cm, multiply it by 2 and rounded up to 65cm. So I needed to cut the strips 65cm as it will be folded in half and tied to the crochet headband.

 
Next is the boring measuring and cutting of the strips. To make the measuring faster, I measured the distance from the edge of the carpet and used the end of my cutting board as a guide. So I just need to align the start of the tulle to the carpet edge and unroll the spool, cut it at the edge of the cutting board. Super fast!


After the strips are ready, you just need to fold a strip into half and tie it to the crochet headband.

 
Go through one of the hole and put the ends through the loop. It's that easy:) Remember to start from the bottom row first and slowly work your way up. The dresses I made consists of 2 full rows of tulle strips and were super puffy. Can't imagine 3 full rows!

 
For this pink dress, the bottom row consists of red strips only, while the top row, I alternated pink and white strips. A great way to play with colors and if you do not like the colors combo, you can just untie the strips and rearrange them again:)

 
Next, I used a 1 inch wide pink satin ribbon and tied to the bodice midfront for the halter straps. Used remnant tulle and my newly brought bow maker to make a matching headband to complete the attire.
 
After that you will have an awesome dress for photoshoot, wedding events or even a birthday dress for the lovely girl in your life;) 


Another set completed that night as I couldn't resist the loveliness of it. The good thing about the crochet headband is that it is super stretchy, it can even fit my 3 yr old boy!

 
For this purple version, the base is made up of black and purple strips, while the top is violet and purple.

 
Potential for cosplaying in future? Hmm mummy will try to sew the costumes for you if you wan. LOL, only if daddy agrees.
 
 
Thanks for dropping by, and have fun crafting your own tulle dresses!
XOXO
Ashley